LiteSpeed SSL/TLS Certificate Install Video
Step 1. Generating a CSR and Private Key with OpenSSL
Open your preferred terminal client as root.
1: Execute the following command to generate a private key and a CSR -
shell
sudo openssl req -new -newkey rsa:2048 -nodes -keyout /usr/local/lsws/server.key -out /usr/local/lsws/server.csr
This will create a private key and a CSR with the name of server.key and server.csr respectively; in the default Litespeed
installation directory.
You will then get a prompt asking you to input the following details regarding your CSR:-
Country Name (2 letter code) [AU]: Type in the 2 letter abbreviation for your country.
State or Province Name (full name) [Some-State]: Full name of the state
Organization Name (eg, company) [Internet Widgits Pty Ltd]:Locality Name (eg, city) []: Complete name of the city, no abbreviations
Organization Name (eg, company) [Internet Widgits Pty Ltd]: If you are a business; Enter your legal entity name. If you're not a business, any value entered will not be used in your certificate.
Organizational Unit Name (eg, section) []: If you are a business; Write the appropriate division of your company. It is best to use something generic such as "IT".
Common Name (e.g. server FQDN or YOUR name) []: Enter your domain name
Email Address []: Enter your email address
After you hit Enter, your Private Key and CSR should be saved successfully in the default litespeed directory.
2: To view your CSR, type in the following command:
shell
sudo cat /usr/local/lsws/server.csr
You can save the CSR in a .txt file or directly proceed to certificate configuration.
Step 2. Order and Configure the SSL Certificate
The next step in the installation process is to order an SSL Certificate. If you visit our SSL Certificates List page, you will have a number of options available, such as a low-cost domain-validated SSL or a multi-domain SSL.
Cheap SSL Certificates
View our low cost SSL Certificates with domain validation.
Starting at $ per year
If you need help choosing the right SSL Certificate, our sales/support team is here to help. Just reach out to them, and they'll be glad to offer their assistance.
1: Once you've added the SSL Certificate into your cart, you can now click on Checkout to complete the process.
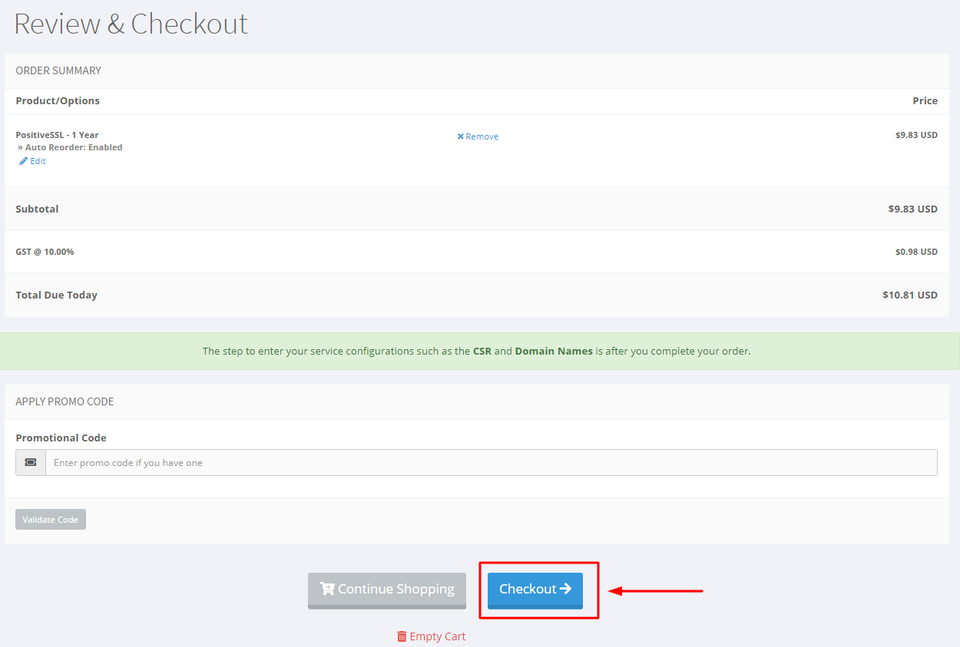
Fill in your account details

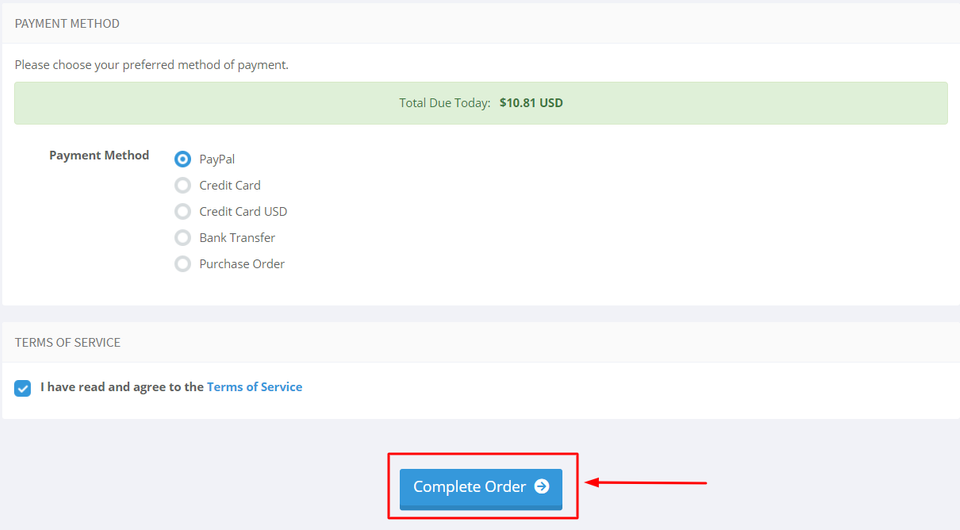
Choose your preferred mode of payment and click on checkout.
2: After you have purchased the SSL Certificate, you can start the configuration process.
This can be started by going into your SSLTrust account and managing your recent purchase.
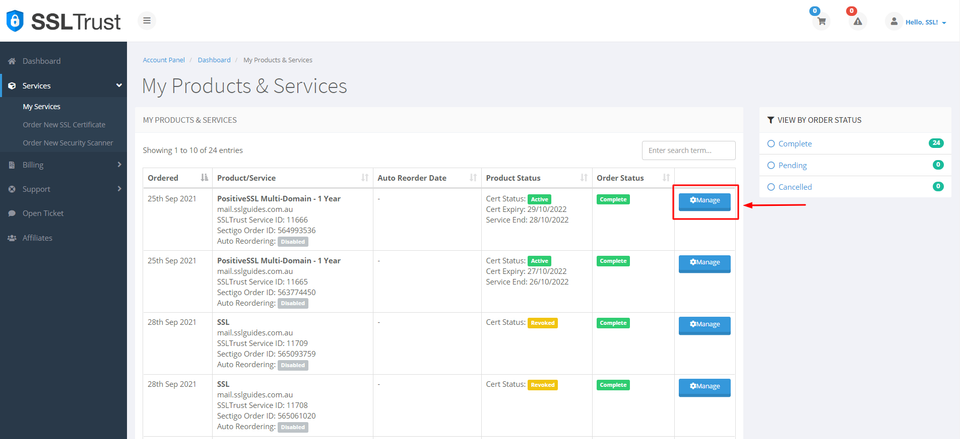
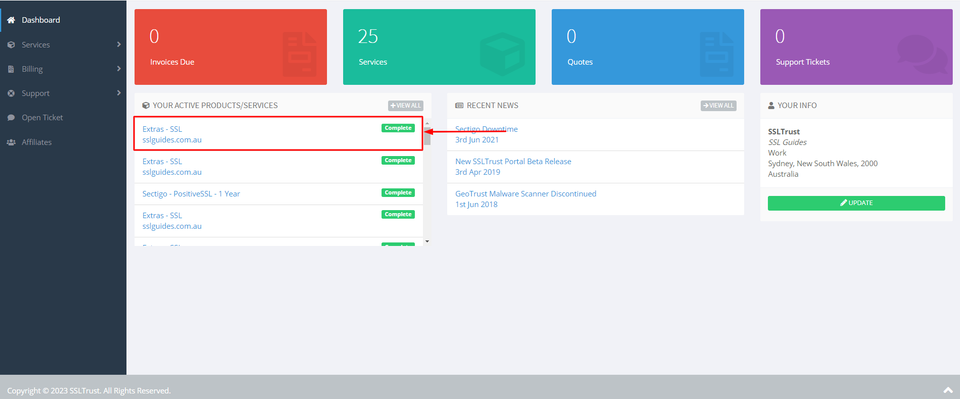
Head over to the SSLTrust Dashboard and under Services, select My Services.
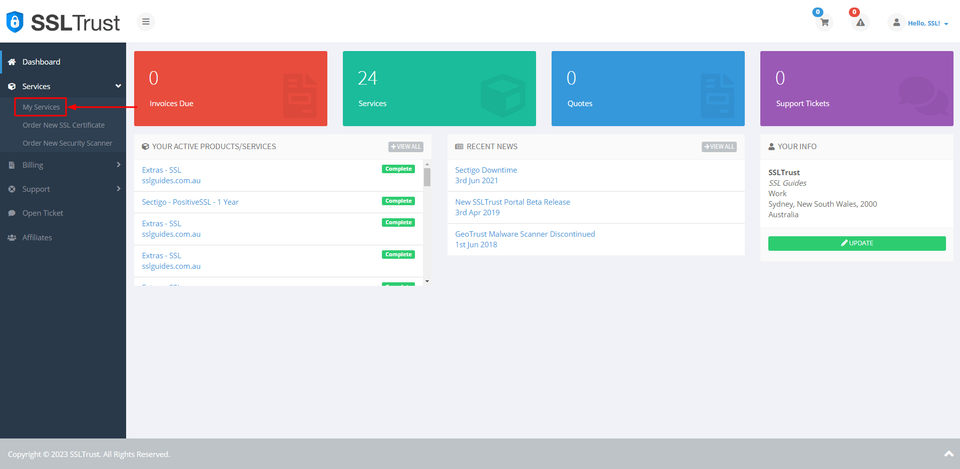
You should be able to see your purchased certificate and order status, now click on Manage
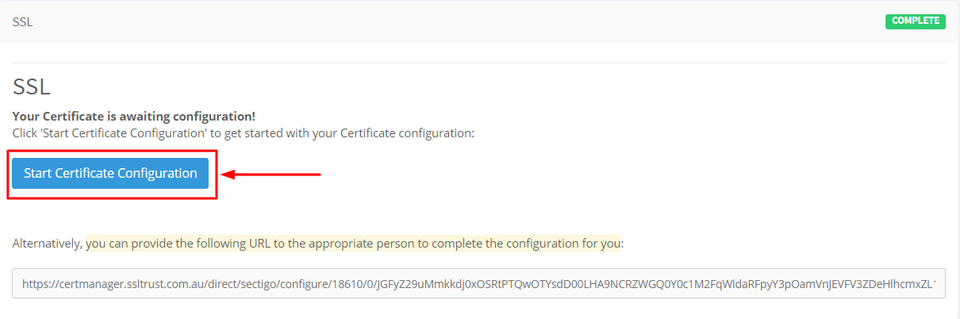
This will take you to the Product Details of your SSL Certificate. Click on start configuration to do the configuration yourself or you can provide the URL below to the appropriate person to complete the configuration for you.
3: Copy and paste the previously generated CSR (Certificate Signing Request) which should include:
text
-----BEGIN CERTIFICATE REQUEST-----
 -----END CERTIFICATE REQUEST-----
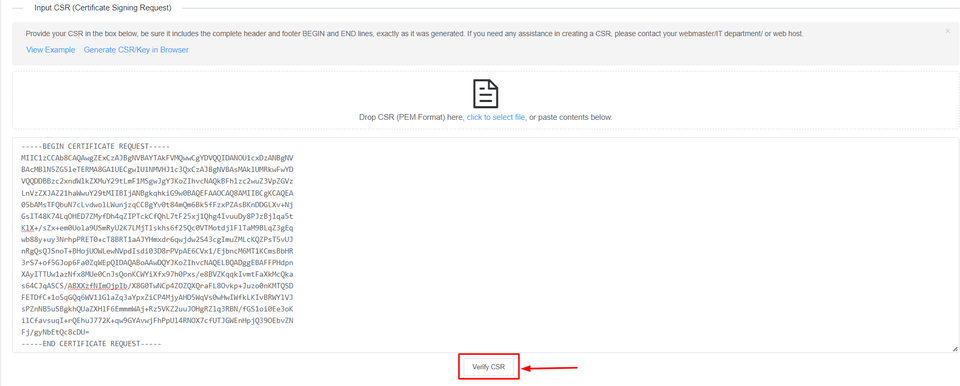
Then, click on Verify CSR.
If the CSR details match the inputs you've entered before, you can now proceed or else generate a new CSR with proper details.

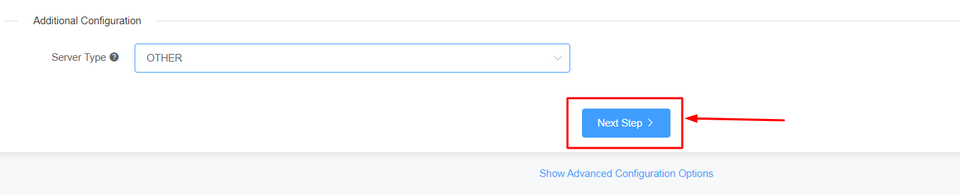
Select the Server Type and click on Next Step>
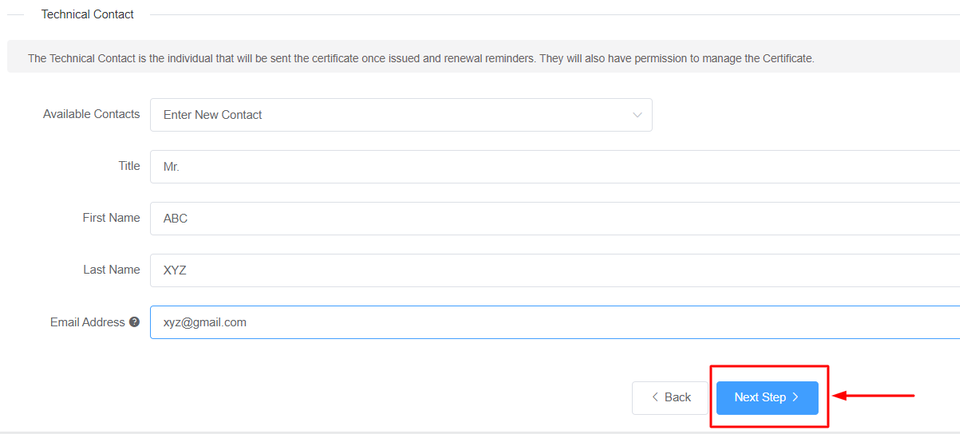
4: Fill in your contact information
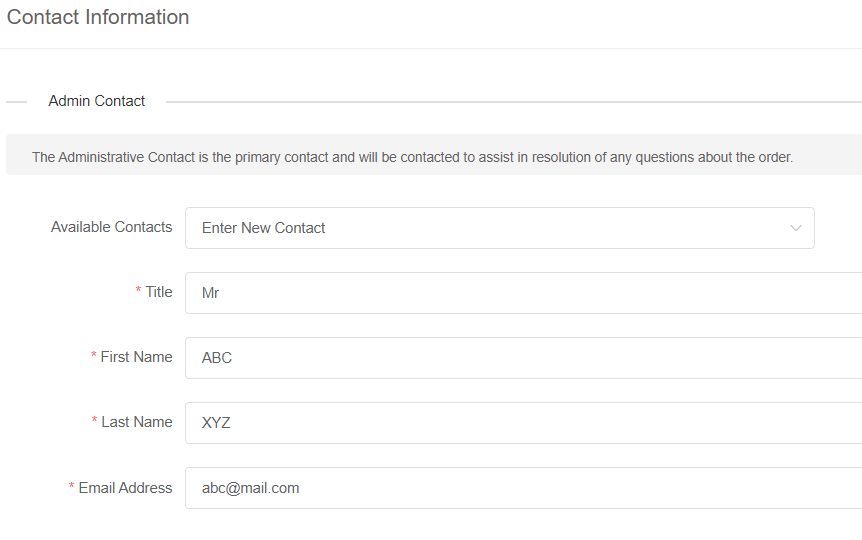
If you have a technical contact managing the certificate for you, please enter their details.
They will also have permission to manage the Certificate and will be sent renewal reminders.
To obtain a business SSL certificate, you will need to provide your business details, including your correct address, phone number, and legal entity name. The Certificate Authority will verify the accuracy of this information. If there are any mistakes, it may cause delays in the process.
Then, click on Next Step
5: The next step in this process is Domain Control Validation (DCV). Basically, Domain control validation is a process used to verify that the person or organization requesting an SSL/TLS certificate for a domain has the authority to control that domain. There are several different methods that can be used to perform DCV, including email validation, DNS validation, and file-based validation.
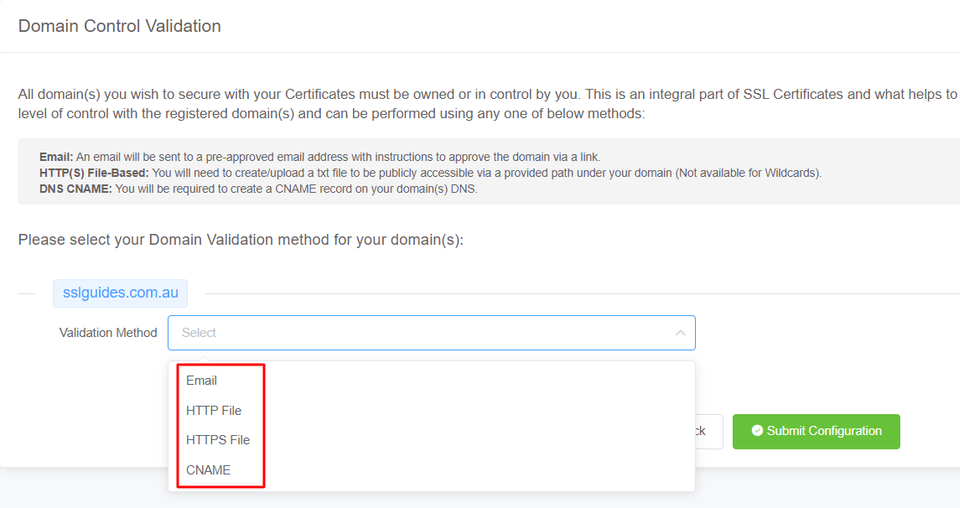
Select the method that is easiest for you. Having an email address with the domain name will be the quickest.
You will be sent an email containing a link which when clicked upon should validate your domain name.
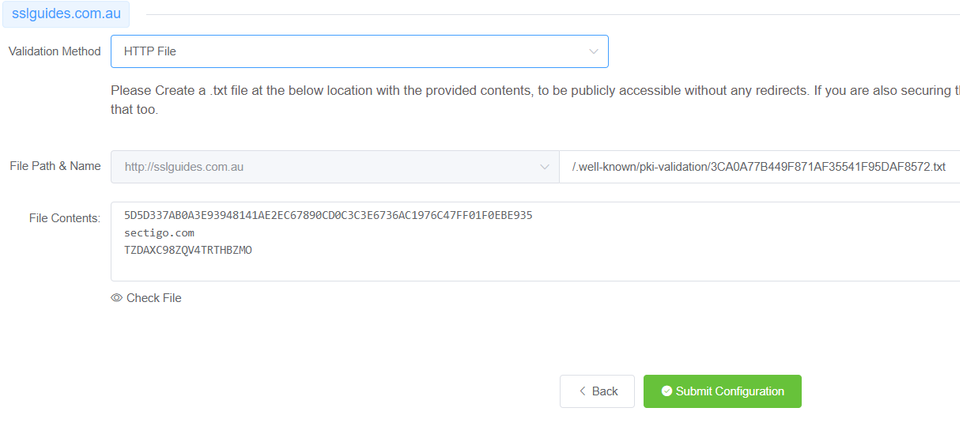
In HTTP/HTTPS File Validation Method, you can create a folder in the specified and directory, paste in the contents and your domain should be validated.
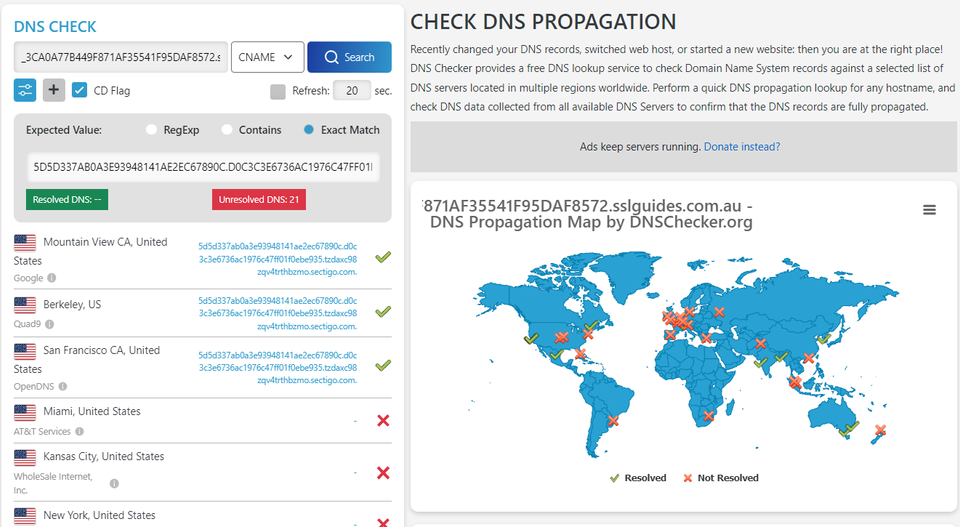
The final method to validate your domain name would be CNAME Validation. Basically you have to create a CNAME record in your DNS Settings to validate your domain name and then click on the Check DNS Record button to verify DNS changes.
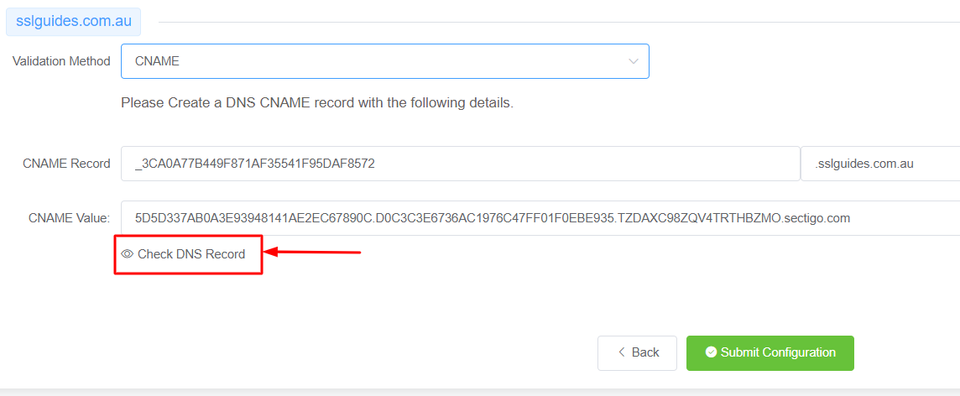
After a few seconds or minutes depending on your DNS propagation speed, the CNAME record should be verified.
The configuration should be a success. Click on the button below to access the validation manager.
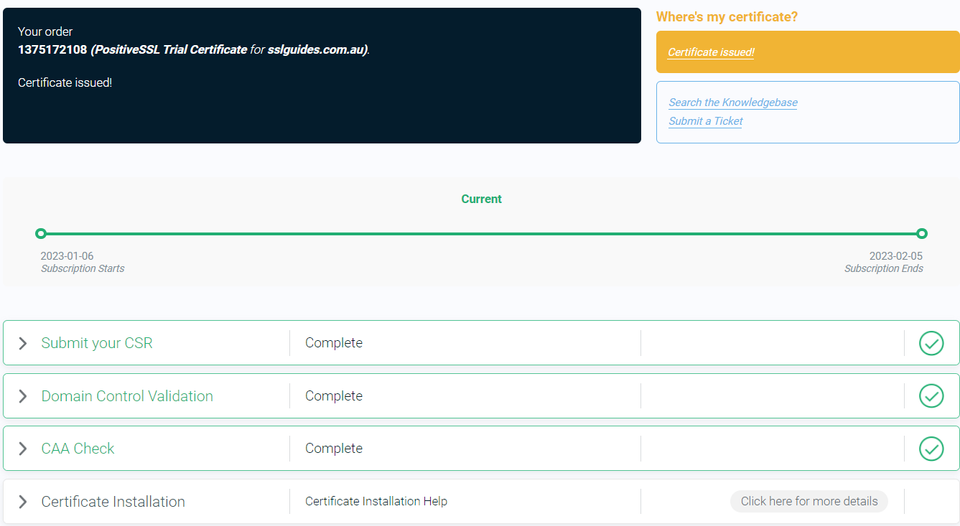
6: Your certificate should have now been issued if you completed all the above steps correctly.
If not, click on Domain Control Validation, and re-submit whatever method you chose for validation.
Upon completing domain validation using the chosen method, your SSL certificate will be issued. If you have ordered a Business SSL, you will need to wait for the Certificate Authority to verify your business address and phone number. If the validation process has not been completed or you have not received your certificate after a certain period of time, please reach out to the support team to check on the status of your certificate.
Step 3. Download your SSL Certificate/s and Upload to Litespeed Webserver
Once your SSL certificate has been issued, you will receive an email with the certificate directly from the Certificate Authority. Alternatively, you can download the certificate from the SSLTrust Portal, which presents the certificate in a convenient, easy-to-use format.
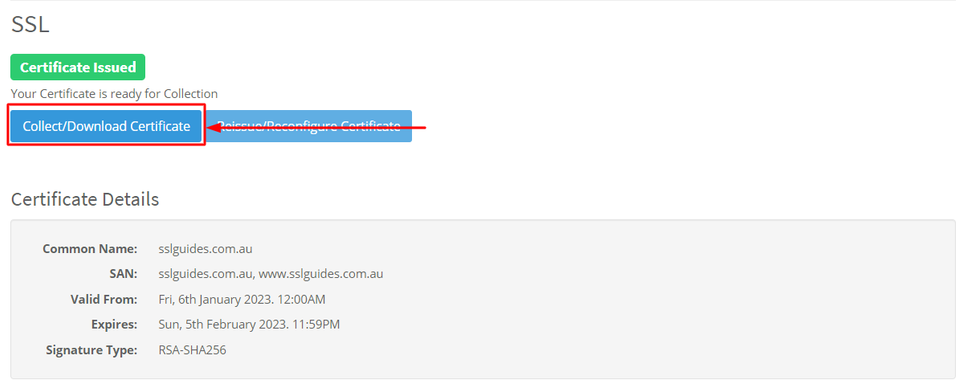
Again, head over to the SSLTrust Dashboard and click on your certificate:-
1: Click on Collect/Download Certificate-
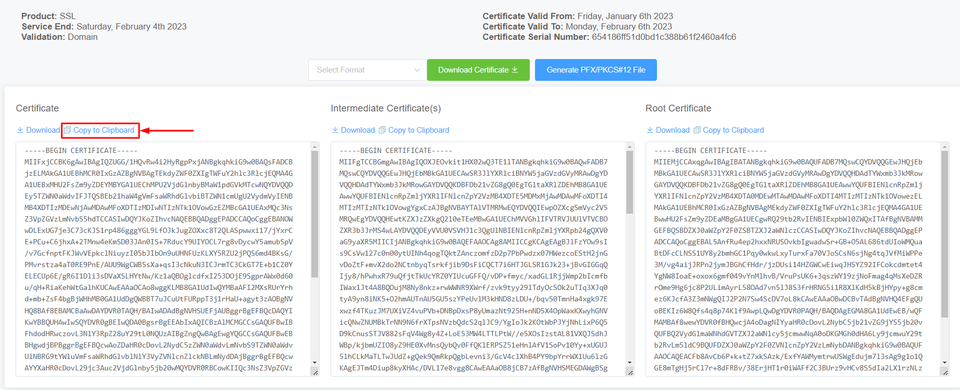
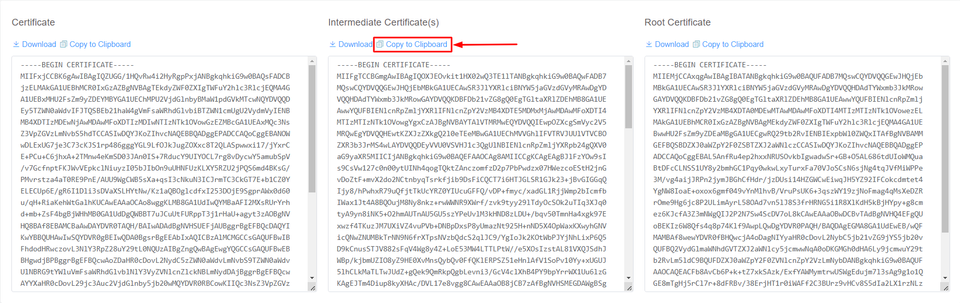
Go to the first column and click on copy to clipboard
Again, open the terminal and execute the following command.
shell
sudo nano /usr/local/lsws/certificate.crt
Paste in your certificate and once you're done, press CTRL+X to save and exit the buffer.
2: Now, head back to the certificate collection page and click on copy to clipboard on the Intermediate certificate.
Now, execute the following command
shell
sudo nano /usr/local/lsws/intermediate.crt
Paste in your intermediate certificate, press CTRL+X to save and exit the buffer.
Step 4. Install the SSL Certificate on Litespeed
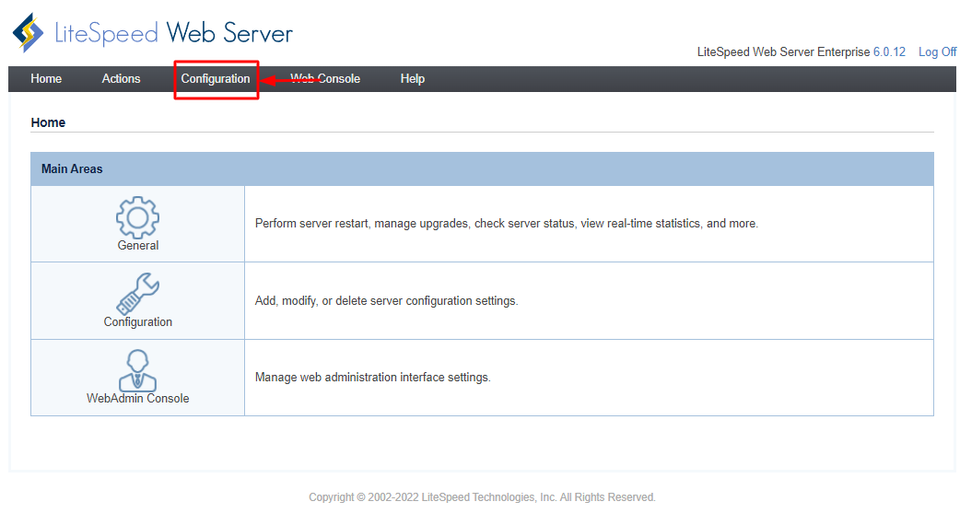
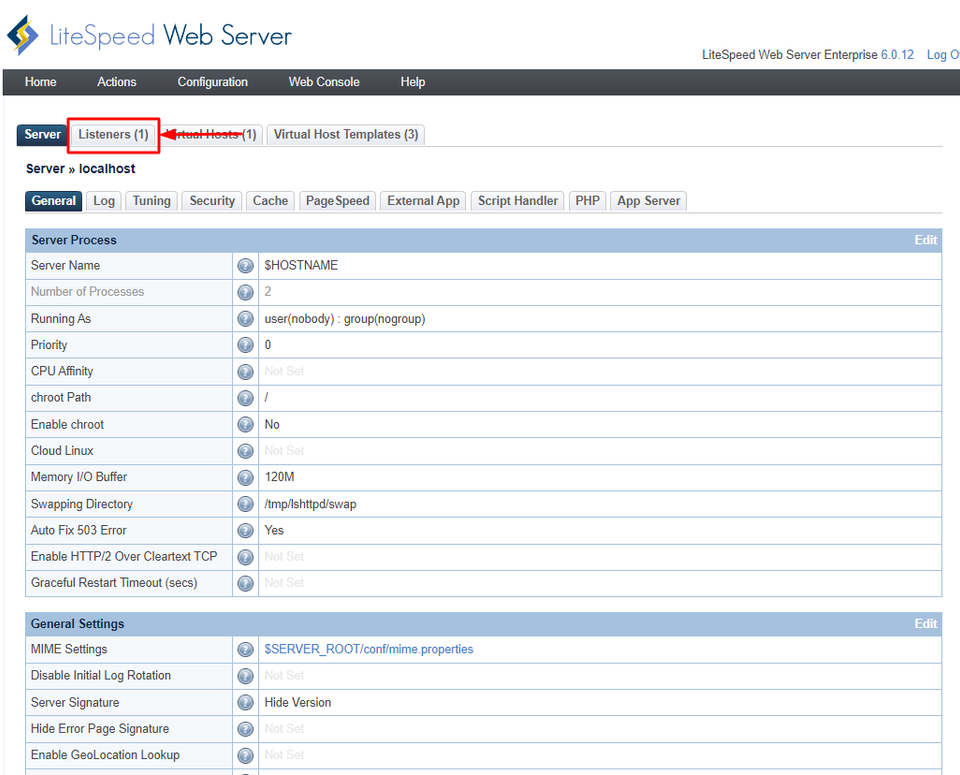
Login as Admin to Litespeed and on the Dashboard click on Configuration
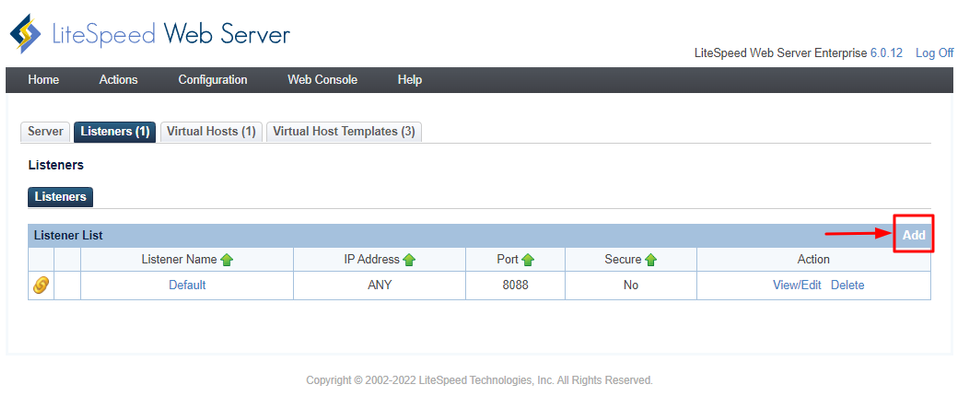
Then, click on Listeners
1: Add a new Listener:
2: Configure the Listener with the following Settings
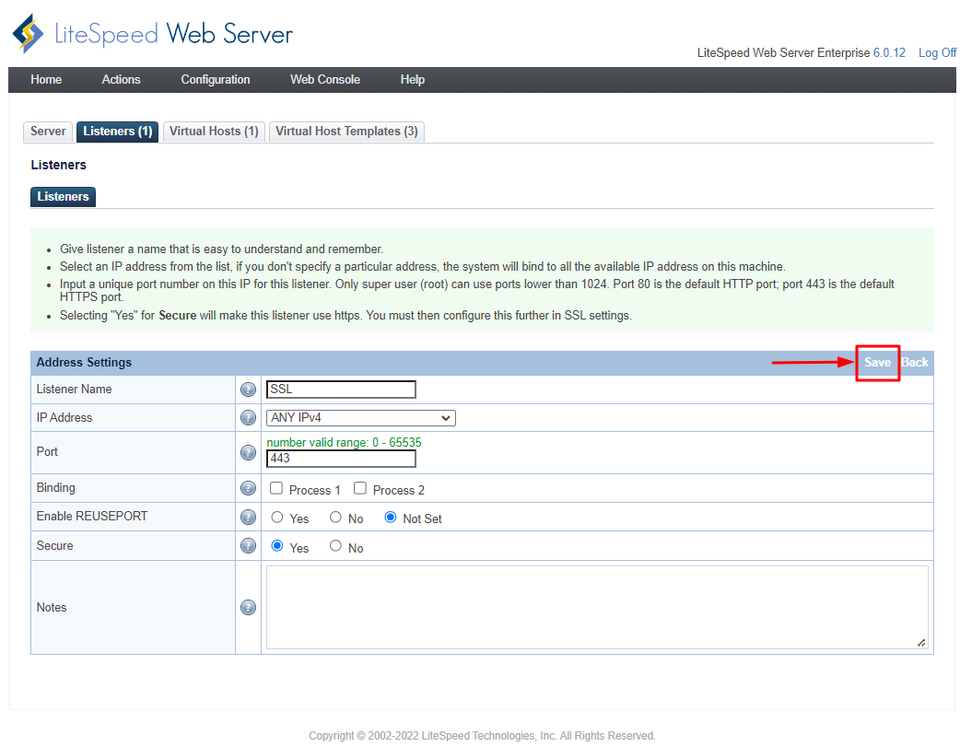
Listener Name - Enter any friendly name for the listener.
IP Address - Select Any from the dropdown unless you want to bind the Listener to a particular CPU. In that case, enter the unique IP-port combination.
Port - Most HTTPS connections are managed through port 443 by default. However, if you have other Listeners operating on that port, this may cause an issue and require you to use another port such as 8443.
Secure - Select Yes.
Notes - Add any internal notes that will help you distinguish the Listener in the future.
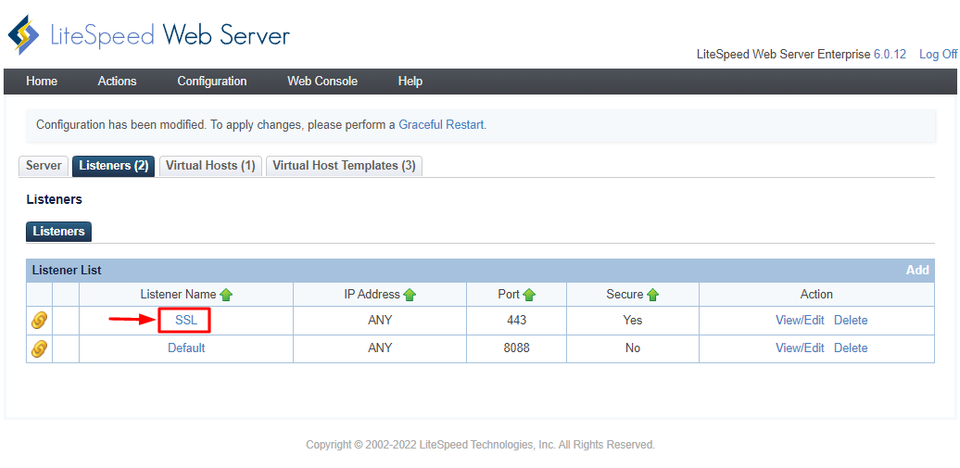
Click Save.
3: Select your listener
4: Select the SSL Tab
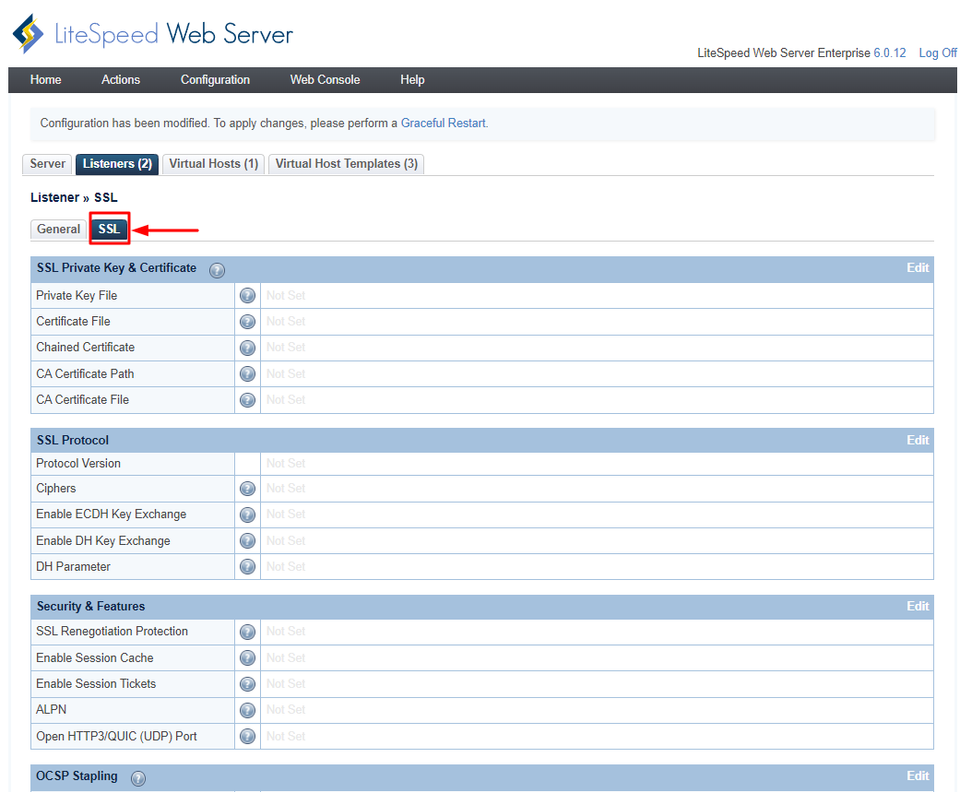
5: Configure the filepaths:
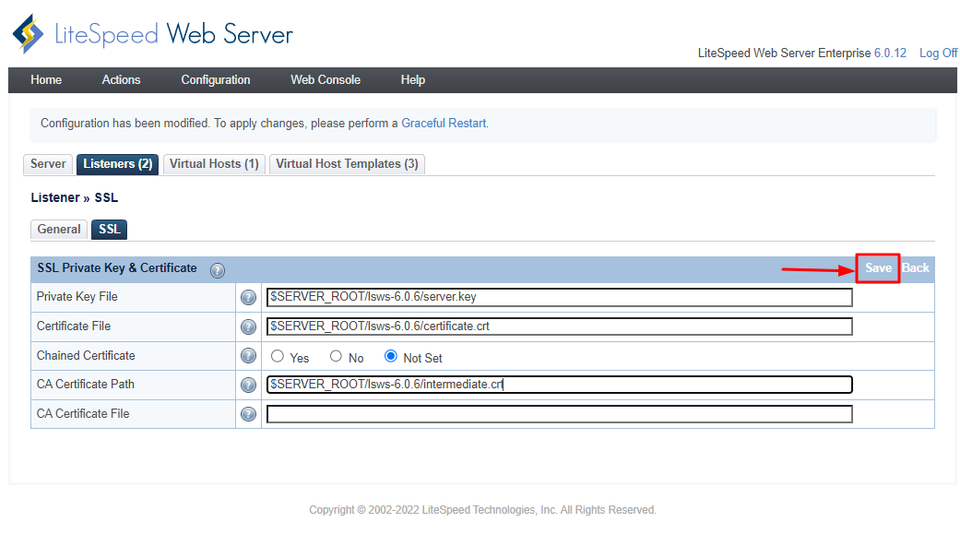
Adhere to the instructions below:
Private Key File - This is the path to your private key that was previously saved on your directory during the generation process via OpenSSL.
text
/usr/local/lsws/server.key
Certificate File - This is the path to your server certificate that the CA sent you. You should already have this saved locally or in your server directory.
text
/usr/local/lsws/certificate.crt
CA Certificate Path - This is the path to the intermediate certificate “file” that the CA sent you.
text
/usr/local/lsws/intermediate.crt
6: Return to the SSL Tab and Select Protocol versions

Check TLSv1.2 and TLSv1.3 and click on Save
7: Map the Virtual Host
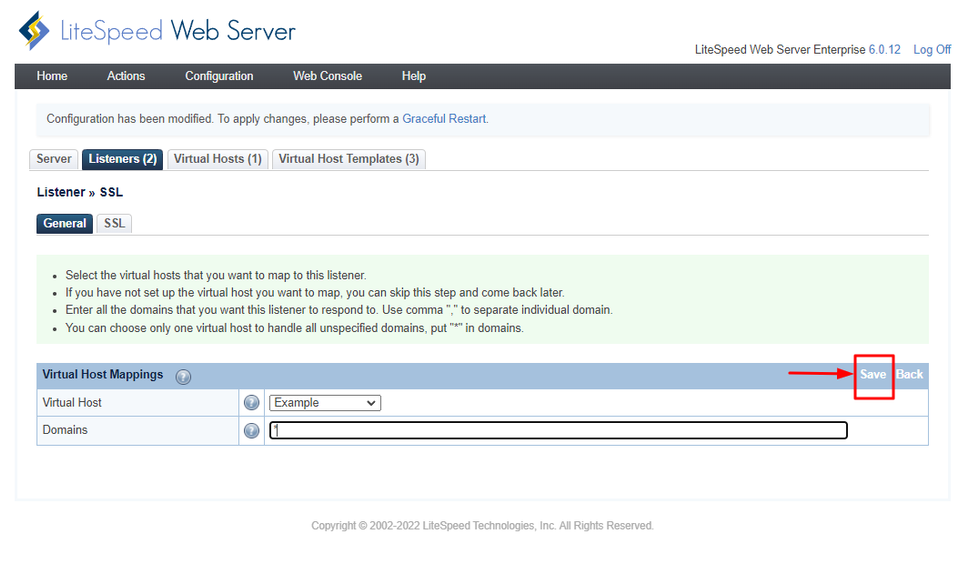
Return to the general tab and find Virtual Host Mappings at the bottom and click on Add.
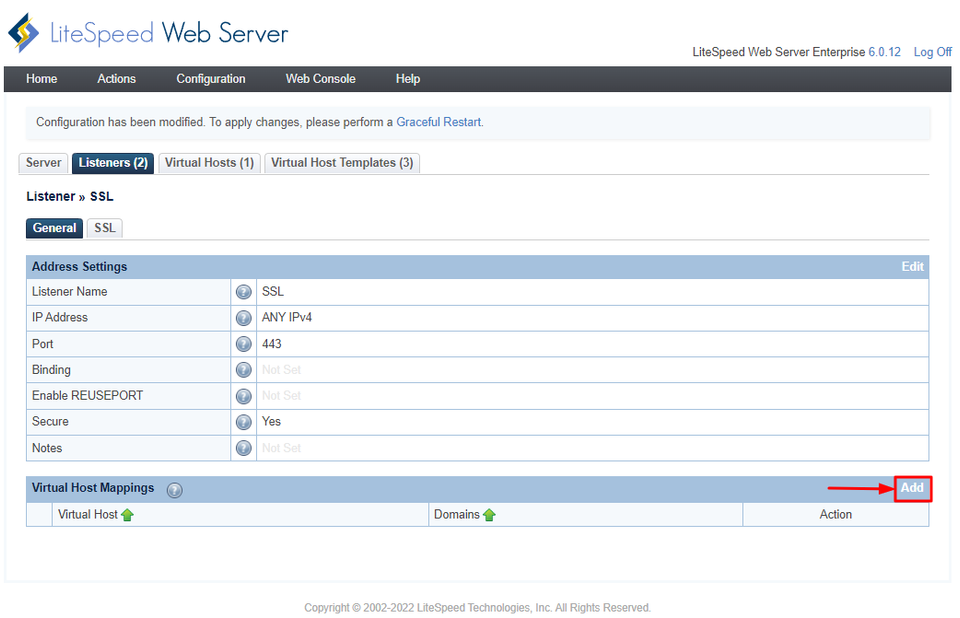
Select a VirtualHost from the drop down menu and enter * in the other field for all domains.
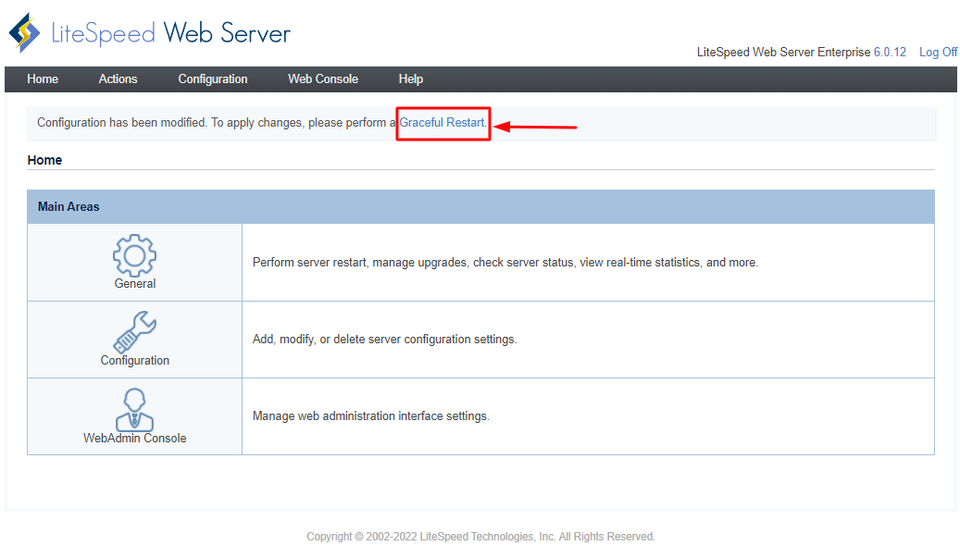
Step 5. Restart the LiteSpeed Webserver
Navigate to your Dashboard by selecting “Dashboard” from the left-hand side menu. Once on your Dashboard, click the green Graceful Restart button.
Your website's connection should now be secure.
Step 6. Test the SSL Certificate
SSLTrust's Free SSL Checker is a tool that allows you to test and validate the SSL/TLS certificates installed on websites. Simply enter a domain name and it will analyze the certificate, providing details like the issuer, expiration date, encryption strength, and whether the certificate is properly configured and trusted by major browsers and operating systems. In SSL tests, receiving an "A" rating typically signifies that the SSL certificate and its configuration meet high security standards.
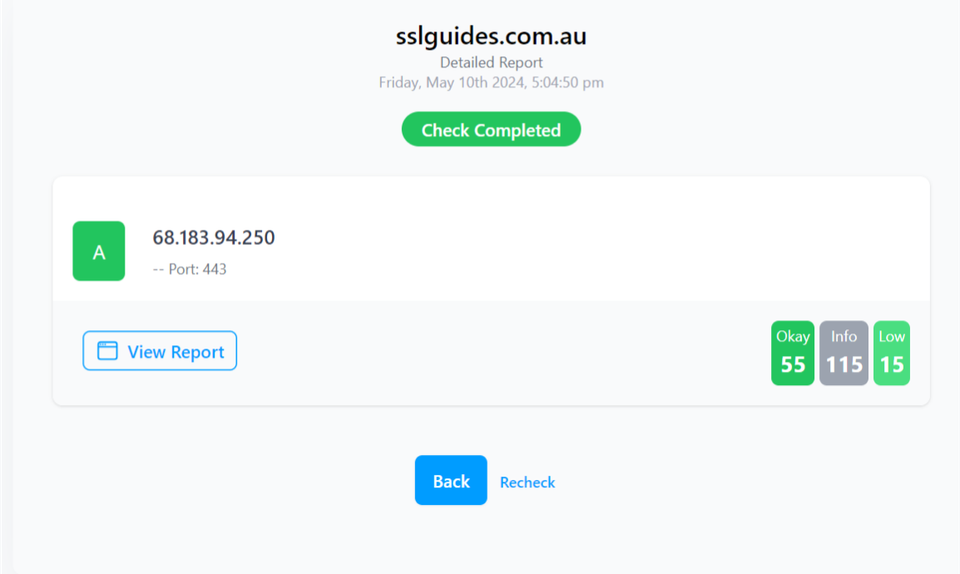
The checker highlights any potential security issues or misconfigurations with the SSL implementation. This free tool makes it easy to verify if a website's SSL certificate is valid and secure, giving visitors confidence their connection is encrypted and their data is protected from eavesdroppers.

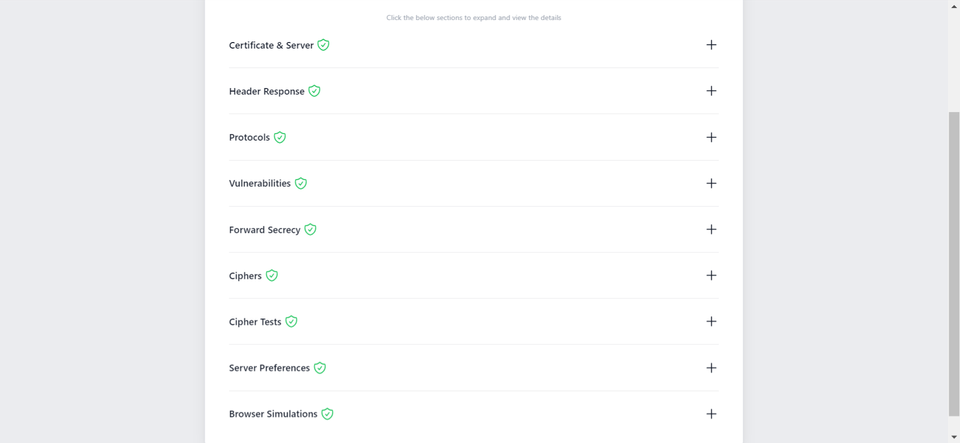
Additionally, you can also performed a detailed check which generates an actionable report with all the ins and out of your SSL Certificate. This includes Protocols, Ciphers, Vulnerabilities and much more.
-
You might require assistance from your web developer or make the necessary updates to your website personally to ensure that all files utilize "https://" and all links leading to and within your website employ "https://".
Discussions and Comments
Click here to view and join in on any discussions and comments on this article.